| Author: | Philippe Carl (philippe.carl at unistra.fr) | ||||||||||||||||
| History: |
2006/08/18: First version 2014/01/14: Works with batch mode macros and able ROI modification with the mouse (requires: ImageJ 1.38p or higher) 2014/02/11: Addition of MacroExtension features for exporting the plot data in macros 2014/08/08: Correction of bugs in the calculate_radial_profile_on_stack feature because of which the minY value within the graph limits wasn't updated and the color of the first curve was not black (but the same than the last used curve color) 2016/05/14: Fixes bug that caused first results table column to be blank 2017/04/18: Thanks to David Kolin, modified the nBins values, so that the differences between radii outputs are 1 pixel (reduced from 1.333 pixels), thus enhancing the resolution of the output results. 2019/09/10: Use of the ImageJ native Plot class for the generation of all the plots (i.e. not anymore of the MultyPlotWindow classes). 2020/11/23: Thanks to Gong Weijia, added the calculation of the min, max, stdev and number of selected pixels values of a given bin as hidden data within the plot in the case of a single picture (i.e. not a stack) integration. |
||||||||||||||||
| Source: | Contained in the JAR file. To open a JAR file, change the extension from ".jar" to ".zip" and double click on it.
or Download Radial_Profile_Angle.java. |
||||||||||||||||
| Installation: | Download Radial_Profile_Angle.jar to the plugins folder, or subfolder, restart ImageJ, and there will the Radial Profile Angle new command in the Plugins menu.
or Download Radial_Profile_Angle.class to the plugins folder and restart ImageJ. Alternatively, download Radial_Profile_Angle.java to the plugins folder or subfolder. Compile and run it using Plugins/Compile and Run. Restart ImageJ and there will be a new "Radial_Profile_Angle" command in the Plugins menu or its submenu. |
||||||||||||||||
| Description: | This plugin is an update of the Radial Profile plugin from Paul Baggethun.
The plugin lets you choose the starting angle and integration angle over which the integration on the defined Roi is done.
The integration will be done over an area defined by : starting angle +/- integration angle.
The size and the position of the Roi can be defined and modified by either using the plugin menu, the mouse or shortkeys on keyboard.
Additionnally, the integration calculation can be done over a whole stack.
The plugin includes also a routine abling the calculation of the radius of the generated Roi and saving the data in a result panel. The new version implements macro recording and excecution features. And following several discussions and advices with Michael Schmid (schmid at iap.tuwien.ac.at) the ROI position and size can be modified with the mouse and the opening angle cone is always drawn together with the round ROI. Finally the plugin takes also into account a bug correction introduced by Kota Miura (miura at embl.de). The keyboard shortcuts of the plugin are the following (active when the picture window is selected) Modify ROI X position by: - 1 pixel -> Left/Right keys - 5 pixels -> SHIFT + Left/Right keys - 10 pixels -> CTRL + Left/Right keys Modify ROI Y position by: - 1 pixel -> Up/Down keys - 5 pixels -> SHIFT + Up/Down keys - 10 pixels -> CTRL + Up/Down keys Modify ROI size by : - 1 pixel -> PageUp/PageDown keys - 5 pixels -> SHIFT + PageUp/PageDown keys - 10 pixels -> CTRL + PageUp/PageDown keys Calculate ROI Radius: g Calculate Radial Profile: qAs the mouse dragging able to change the ROI position, the mouse wheel is associated to the following keyboard shortcuts (active when the picture window is selected) Modify ROI size by : - 1 pixel -> Up/Down mouse wheel - 5 pixels -> SHIFT + Up/Down mouse wheel - 10 pixels -> CTRL + Up/Down mouse wheel Modify integration angle size by : - 1 pixel -> Alt + Mouse wheel - 5 pixels -> Alt + SHIFT + Mouse wheel - 10 pixels -> Alt + CTRL + Mouse wheelAt last, if a numerical field is selected its value can be modified by mean so the mouse wheel associated to the following keyboard shortcuts (active in the picture and plugin window) Modify value by : - 1 unit -> Up/Down mouse wheel - 5 units -> SHIFT + Up/Down mouse wheel - 10 units -> CTRL + Up/Down mouse wheelThe MacroExtension features for exporting the plot data in macros are:
					Ext.getStackSize    : to get the number of images on the stack (is similar than to get the slices value after a getDimensions(width, height, channels, slices, frames))
					Ext.getBinSize      : to get the length of the curve array
					Ext.getXValue    (j): to get the distance from center                                  at position i (0 <= i < Ext.getBinSize)
					Ext.getYValue (i ,j): to get the curve value                                           at position i, at slice j (when trying to access to Ext.getYValue(i,j) values with j > 0, it is mandatory to activate the calculate_radial_profile_on_stack checkBox)
					Ext.getMinValue  (j): to get the min          value of the bin at distance from center at position i (0 <= i < Ext.getBinSize)
					Ext.getMaxValue  (j): to get the max          value of the bin at distance from center at position i (0 <= i < Ext.getBinSize)
					Ext.getStdevValue(j): to get the stdev        value of the bin at distance from center at position i (0 <= i < Ext.getBinSize)
					Ext.getSizeValue (j): to get the number of elements of the bin at distance from center at position i (0 <= i < Ext.getBinSize)
Macro example:
					run("Radial Profile Angle", "x_center=512 y_center=384 radius=448 starting_angle=0 integration_angle=180 calculate_radial_profile_on_stack");
					run("Clear Results");
					for(j = 0; j != Ext.getStackSize; j++)
					{
						for(i = 0; i != Ext.getBinSize; i++)
						{
							setResult("Slice", j * Ext.getBinSize + i, j + 1);
							setResult("X"    , j * Ext.getBinSize + i, Ext.getXValue(i));
							setResult("Y"    , j * Ext.getBinSize + i, Ext.getYValue(j, i));
						}
					}
					updateResults();
Alternatively, a macro example can be downloaded here.
|
||||||||||||||||
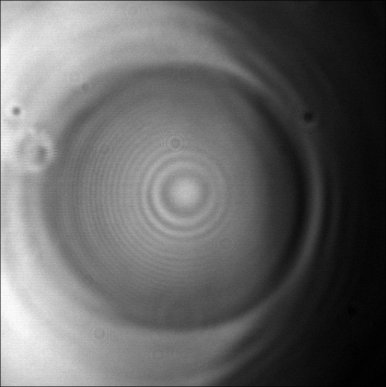
| Application: | The picture shown below corresponds to an emulsion droplet observed with the RICM technique while being deformed by means of an AFM colloidal probe technique.
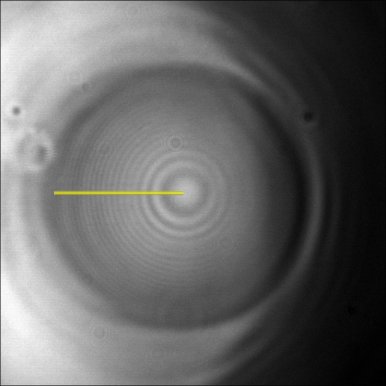
Thus one solution in order to extract the profile would be to use a simple line profile only on the left part of the droplet:
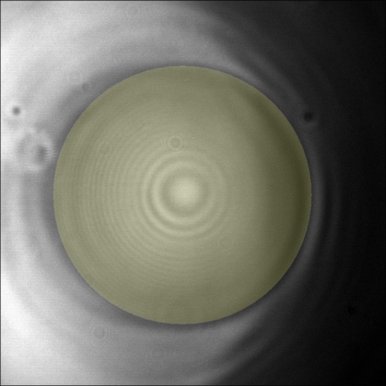
Another solution would be to use the Radial Profile plugin from Paul Baggethun and in this case we obtain the following result:
And with the Radial Profile Extended plugin it is possible by defining a starting angle and integration angle to perform a radial profile that can be restricted to a certain cone in order to optimize the results:
Obviously in the Radial Profile Extended plugin by setting the integration angle to +/-180° (2 x 180° = 360°) the obtained results will be similar to the one of the Radial Profile plugin and this independently of the chosen starting angle. |